User Manual
Everything you can do on the platform.
A visual, step-by-step guide for community members, city staff, and admins. Use the sidebar to jump to a section.
Platform Overview
The Community Event & Partnership Portal is the city's one-stop platform for discovering events, booking municipal rooms, applying as a performer, vendor, sponsor, or community organization, and (for city staff) running every operational side of the program.
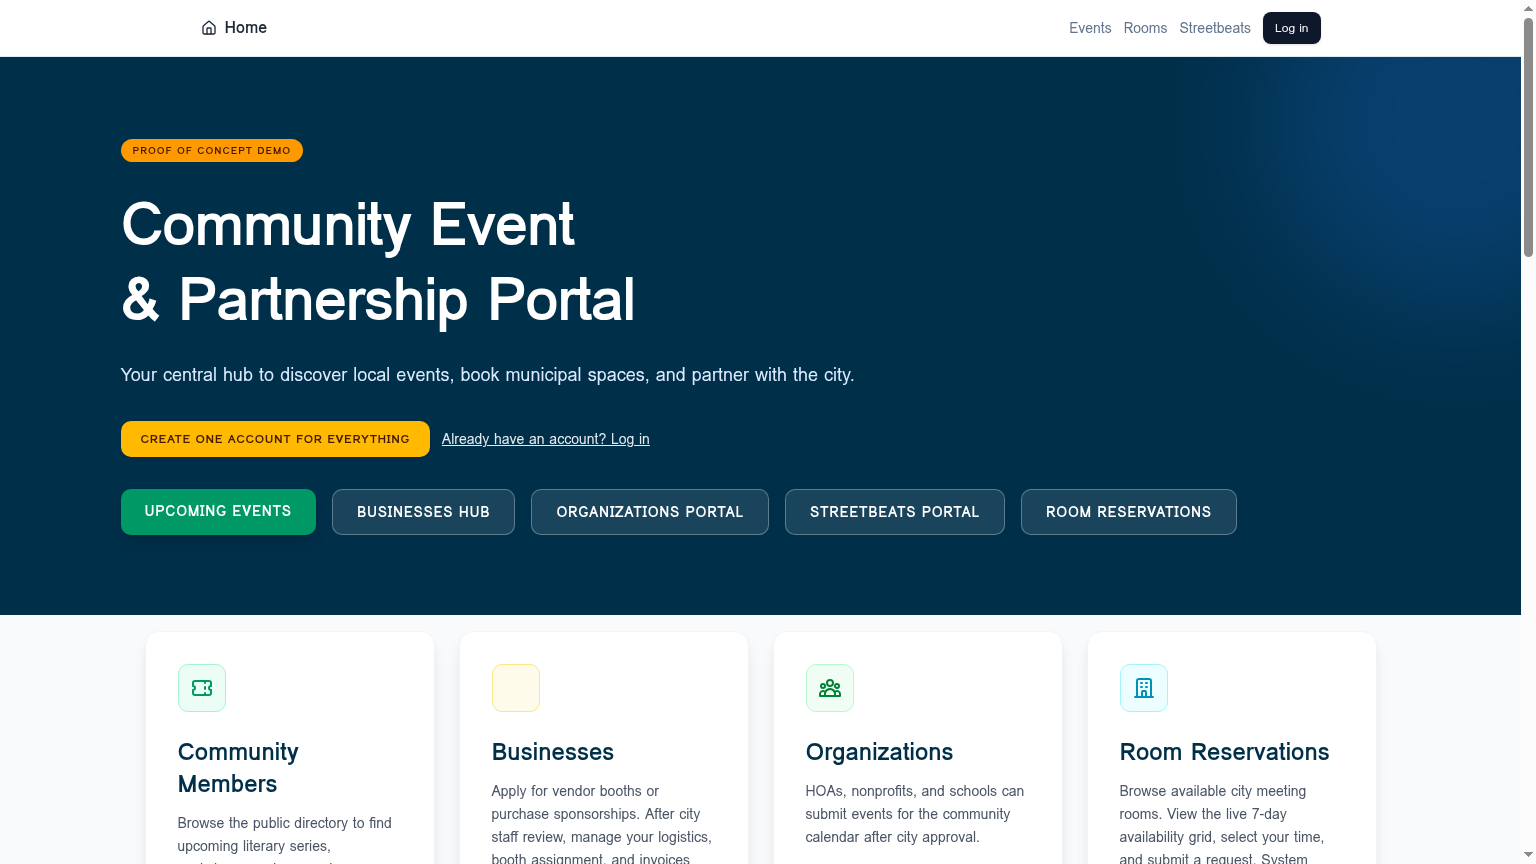
Everyone starts at the same landing page. From there, your view of the app depends on your role and which department you're currently acting in:
- Community members browse events, buy tickets, book rooms, and apply to programs across every department.
- Staff see an Event Ops sidebar scoped to their active department — events, venues, approvals, and box office only show records belonging to that department.
- Dept admins & Super admins additionally manage department settings, branding, room policies, user roles, and which platform modules are turned on.
Accounts & Logging In
One account works across every program. You can be a ticket-buyer, musician, org admin, and vendor under the same login.
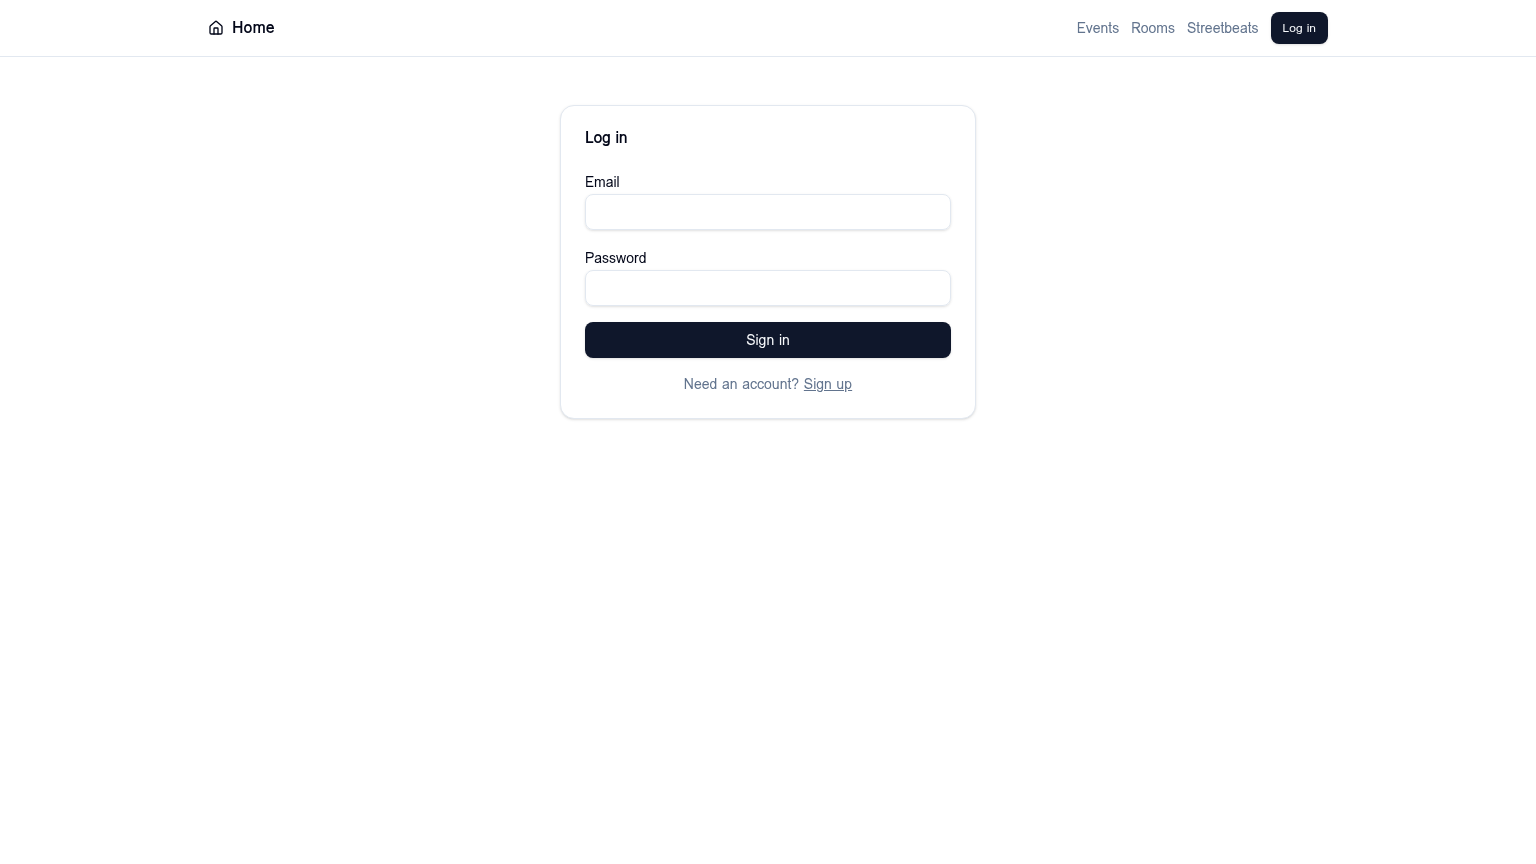
- 1
Sign up or log in
Click Log in in the top-right corner. New users can tap Sign up to create an account with email and password. - 2
Land on your Hub
After signing in you'll arrive at your personal hub showing everything you can do. - 3
Add roles as you go
Need to apply as a musician later? Just open your hub and tap Apply as a Musician. Same login, more capabilities. - 4
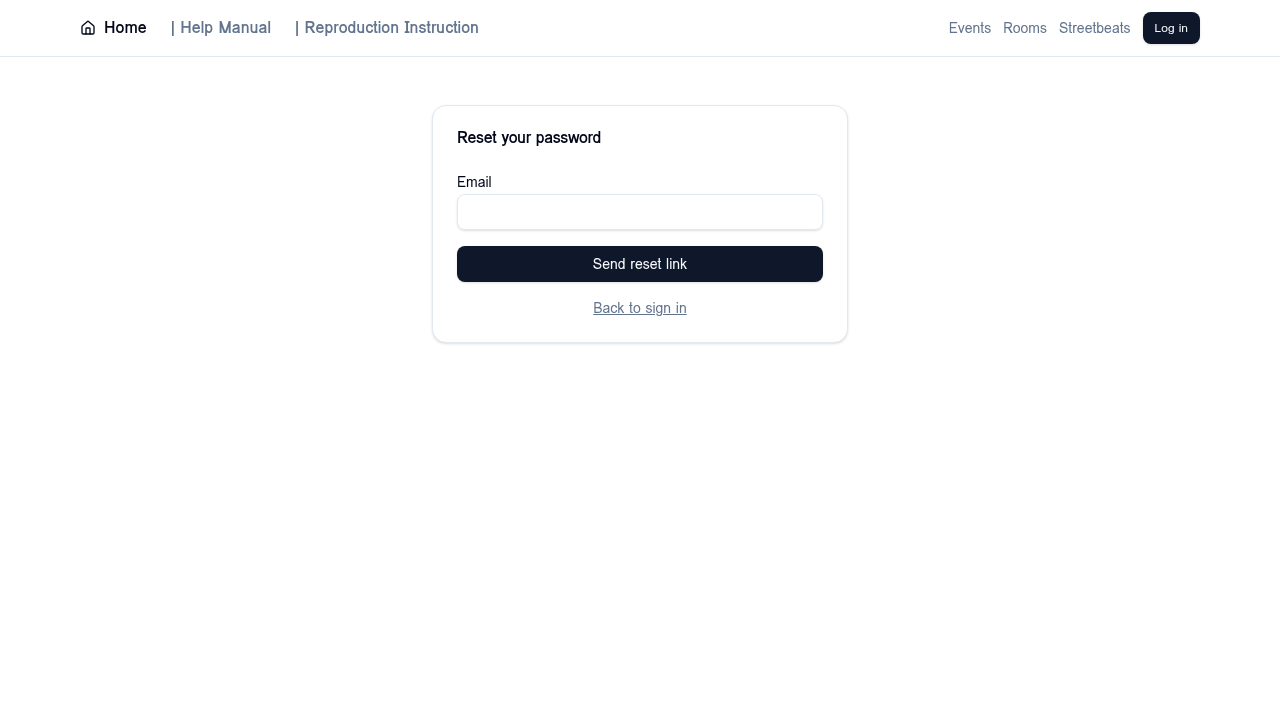
Forgot your password?
On the login screen, click Forgot password? and enter your email. We'll send a one-time reset link — open it to choose a new password.
Your Personal Hub
Your hub at /hub is mission control for everything you do with the city. It groups actions into three rows: Apply / Add a role, Do something, and Manage your stuff.
/departments and pick one (for example, the Library) — see Department Hub Pages.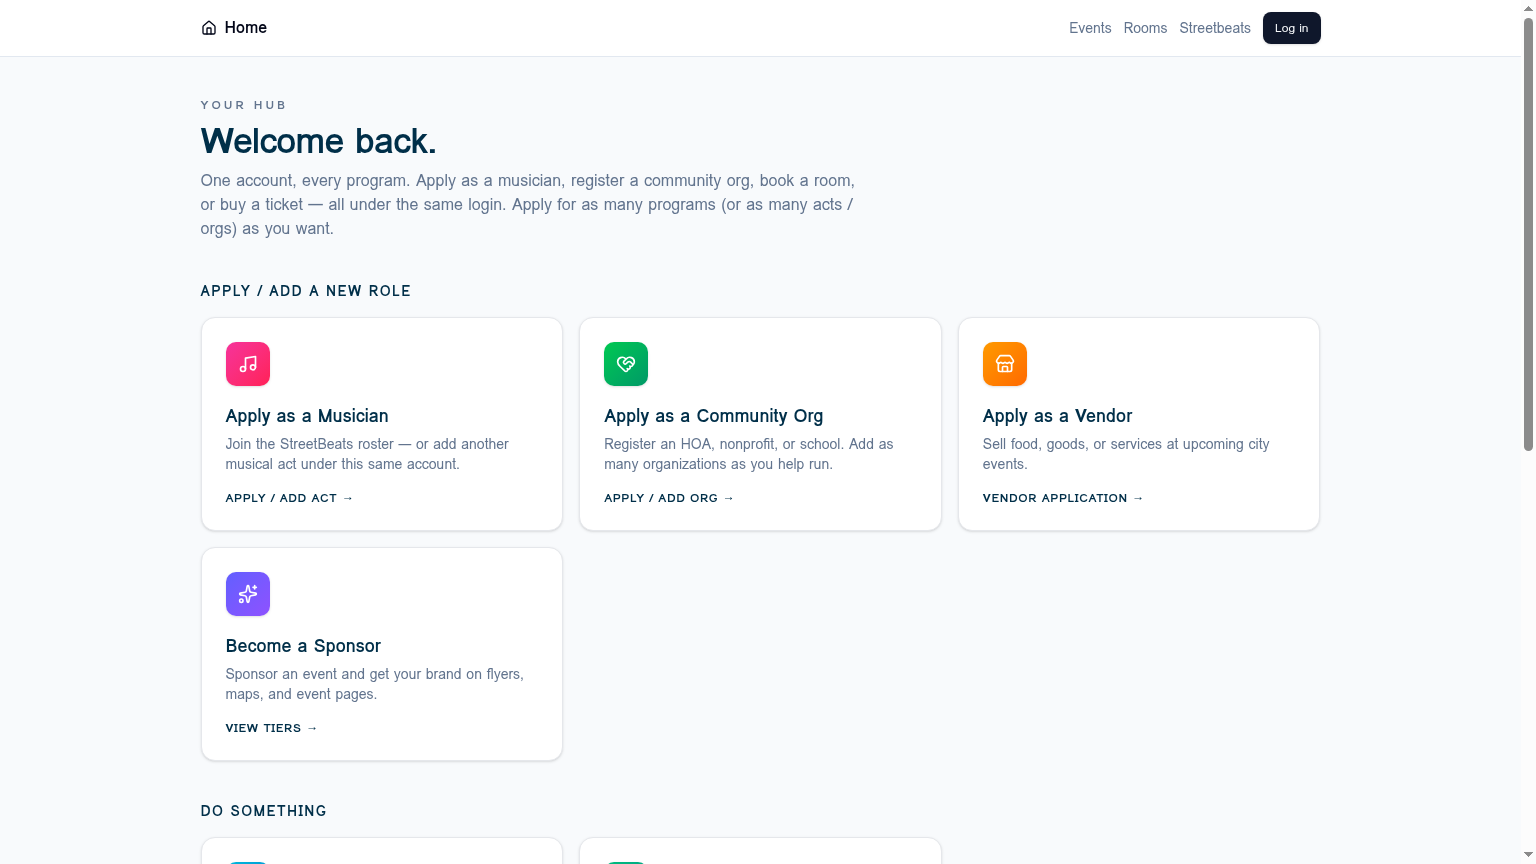
- Apply as musician, community org, vendor, or sponsor.
- Book a room or browse events.
- Review your tickets, room reservations, gigs, and orgs.
- Staff and admins see extra "Staff Portal" / "Admin" tiles.
Browsing Events
The /events feed combines city-run events, community gatherings, and live music.
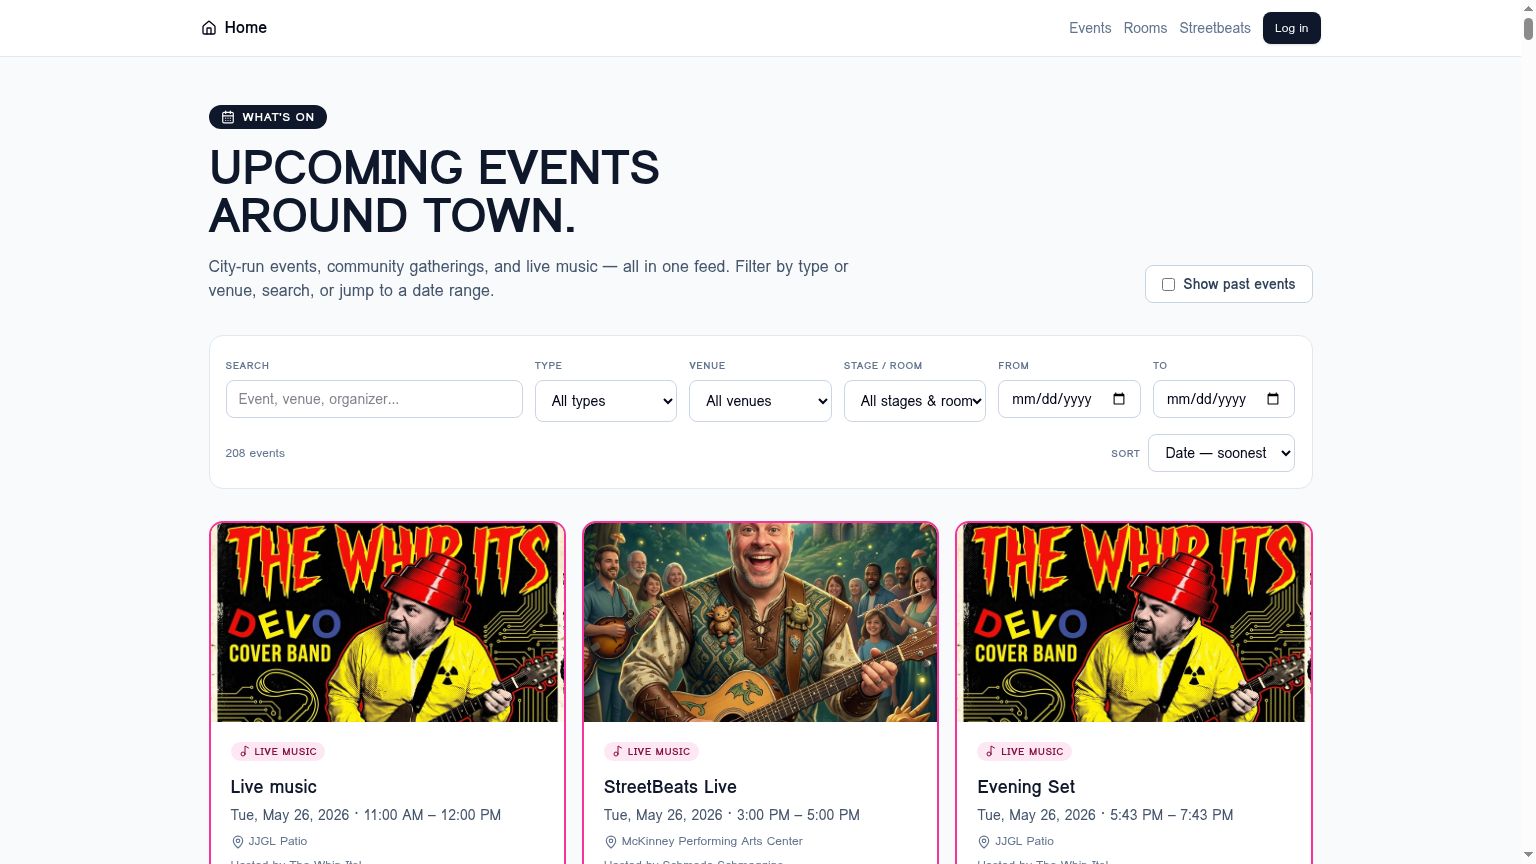
- 1
Filter and search
Use the search box plus type, venue, and stage/room dropdowns. Date range narrows the feed to a specific window. - 2
Open an event
Click any card to see full details, sessions, sponsors, and the ticket button. - 3
Look for waitlist callouts
Sold-out events show a "Sold out — join the waitlist" badge directly on the card image.
My Wallet — Tickets, Prizes & Raffles
My Wallet at /wallet is the single place for everything you've earned or purchased. It replaces the old /my-tickets page (that URL still works and redirects here). A summary row at the top shows your counts at a glance, and three tabs split the contents:
- Events — event tickets you've reserved or purchased, each with a scannable QR for door check-in. Groups get one QR per seat, and you can download any QR as a PNG.
- Prizes — virtual prize tickets earned by completing Civic Quests. Tap Show QR to redeem and present it at the listed pickup location (City Hall or a sponsor). Status chips show issued, redeemed, or void.
- Raffles — your entries into active raffles, with prize, draw date, and entry count. Winners see a 🎉 banner once the draw is run.
Buying an event ticket
- 1
Pick a tier and quantity
Free tickets reserve a seat. Paid tiers route through secure checkout. - 2
Find it under Wallet → Events
Open/walletand stay on the Events tab — every ticket renders with its QR, holder name, tier, and venue. - 3
Show the QR at the door
Staff scan it on arrival. Each seat gets its own QR for groups. - 4
Join a waitlist if sold out
You'll get notified automatically if a seat opens.
Deep-link tip: append ?tab=prizes or?tab=raffles to jump straight to a section, e.g. from a confirmation email after a quest completion.
Booking a Room
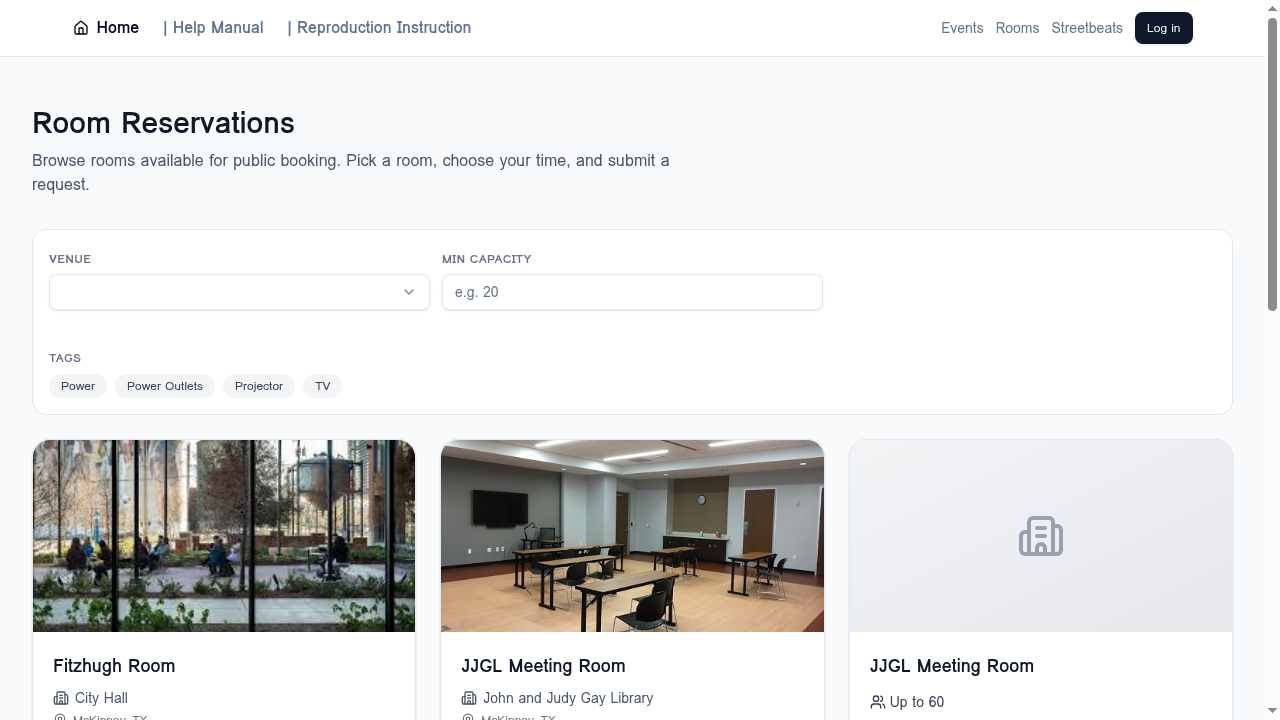
- 1
Filter to the right room
Use the filter bar to narrow down by venue, minimum capacity, and tags (Power, Projector, TV, etc.). Filters update the list instantly and are remembered in the URL — share the link and the recipient sees the same filtered view. - 2
Pick a room
Each card shows the photo, capacity, building, and address. Click for full details. - 3
Choose a time
The detail page shows a live 7-day availability calendar. Booked or blocked-by-event windows are greyed out. - 4
Read and accept the departmental room policy
Before the request is submitted, a modal shows the room policy set by the department that owns the room (rules, fees, cleanup, alcohol, etc.). You must tick "I agree to this departmental policy" to continue. Each department writes its own policy, so the wording changes with the room. - 5
Instant-bookable rooms confirm immediately
If the room is marked instant-bookable, your reservation is approved on submit and you receive a confirmation email right away — no staff review needed. Otherwise it joins the pending queue for that department's staff to review.
StreetBeats (Musicians)
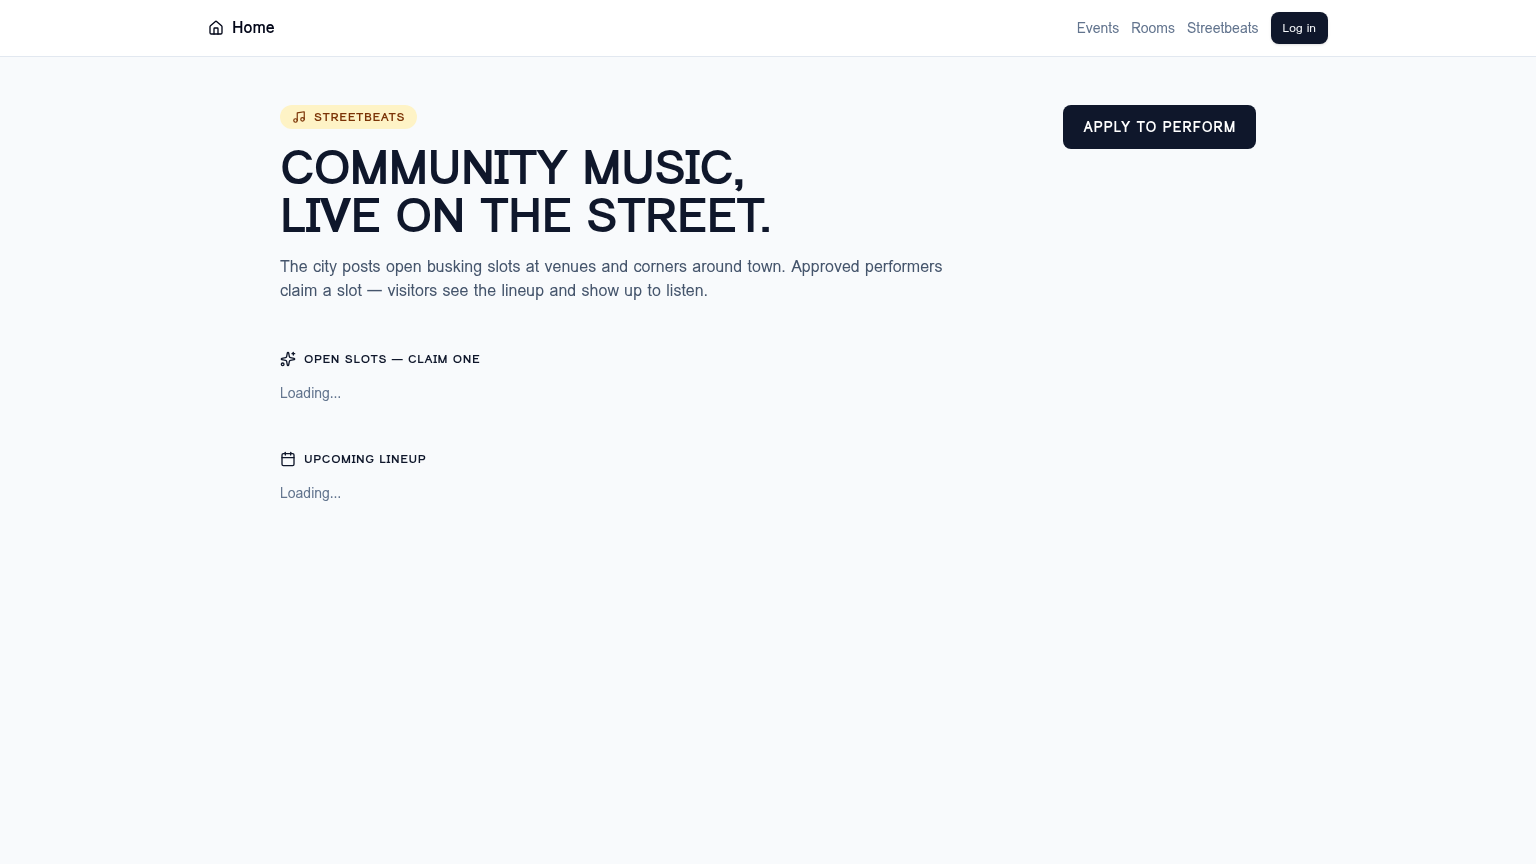
StreetBeats lets approved musicians claim open busking slots at city venues. One account can hold up to 10 separate artist profiles — perfect for solo acts who also play in bands, or for managers handling several performers.
- 1
Create your first artist profile
From My Artist Profiles on the StreetBeats page (or Apply as a Musician in the Hub), fill in stage name, genre, bio, photo, and social/tip links. - 2
Add more profiles if you wear multiple hats
Tap Add another artist to register an additional persona. Each one is reviewed and approved independently. - 3
Wait for approval
Staff review each artist and notify you by email. Pending profiles can't claim slots yet. - 4
Claim a slot — and pick which artist
On the StreetBeats page or My Gigs, hit Claim. If you have more than one approved profile, a dialog asks which artist is performing this gig. The slot is locked to that artist and appears on their public profile. - 5
Release if your plans change
From My Gigs, hit Release on an upcoming gig to open the slot back up for other performers.
/artists/<id> showing upcoming gigs, social links, and tip jar.Gig Flyers & Sharing
Every claimed StreetBeats gig has its own public flyer page at /gigs/<id> — designed for sharing on phones, printing as a QR poster, or dropping into social posts. The "More info" button on each music card on the events page links straight to it.
- Date, venue, address — the address links straight to Google Maps so listeners can navigate.
- Stage features — power, shade, seating, bathrooms, and backline are shown as colored chips.
- Scan-or-tap QR grid — each social/tip link becomes a QR code that doubles as a tap target on mobile.
- One-tap share row — WhatsApp, Facebook, X, Instagram (copy + open), and copy-link.
Community Organizations
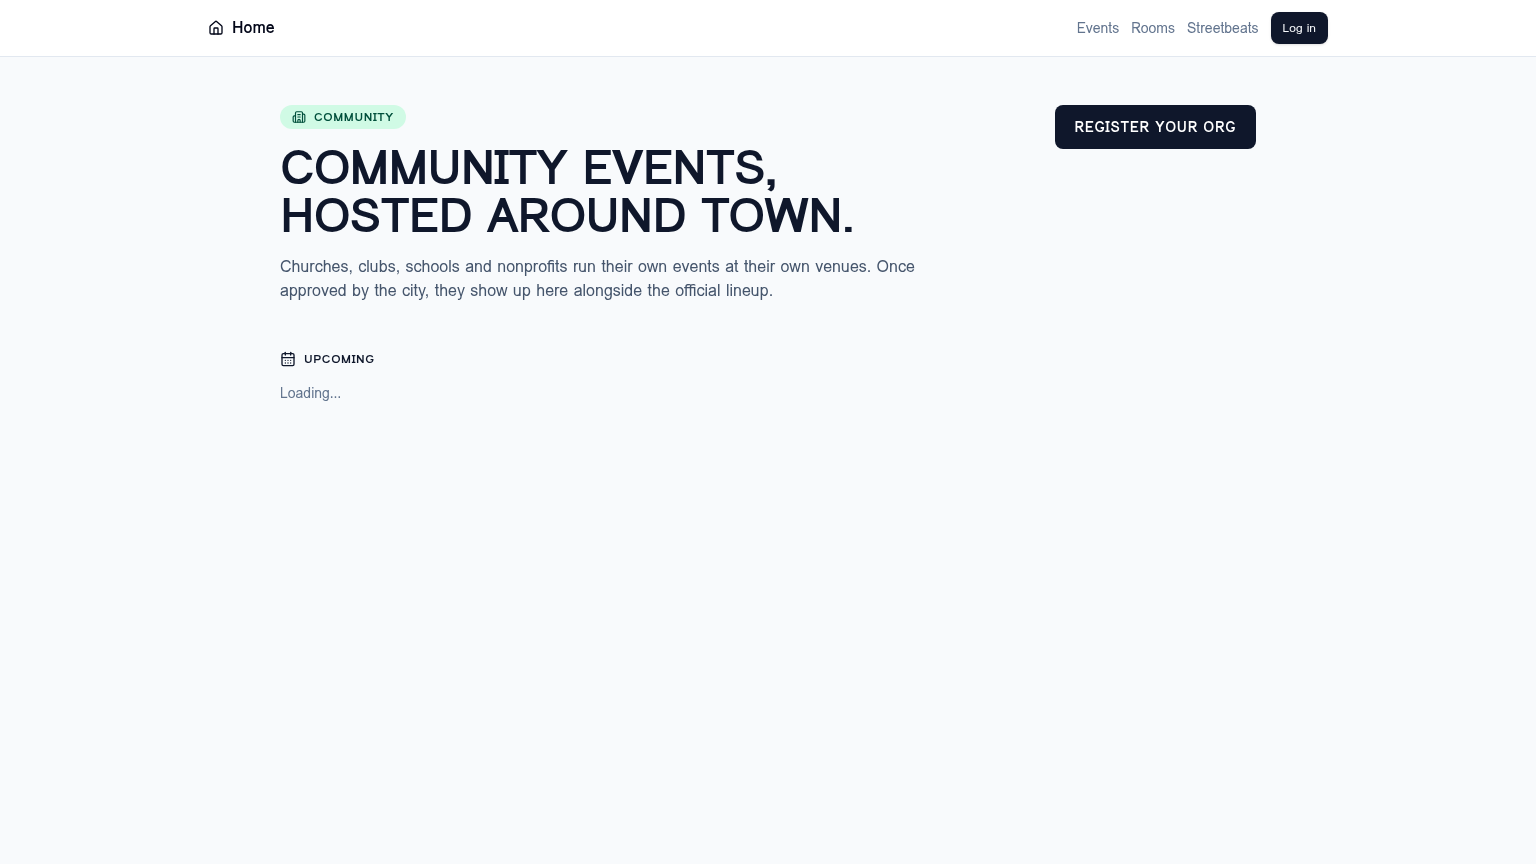
HOAs, nonprofits, churches, and schools can register as a Community Org and submit events for the city calendar.
- 1
Register your org
Tap Register Your Org. You can have multiple orgs under one account. - 2
Submit events
Once approved, submit events from My Organizations. Staff approve before they go live.
Vendor Applications
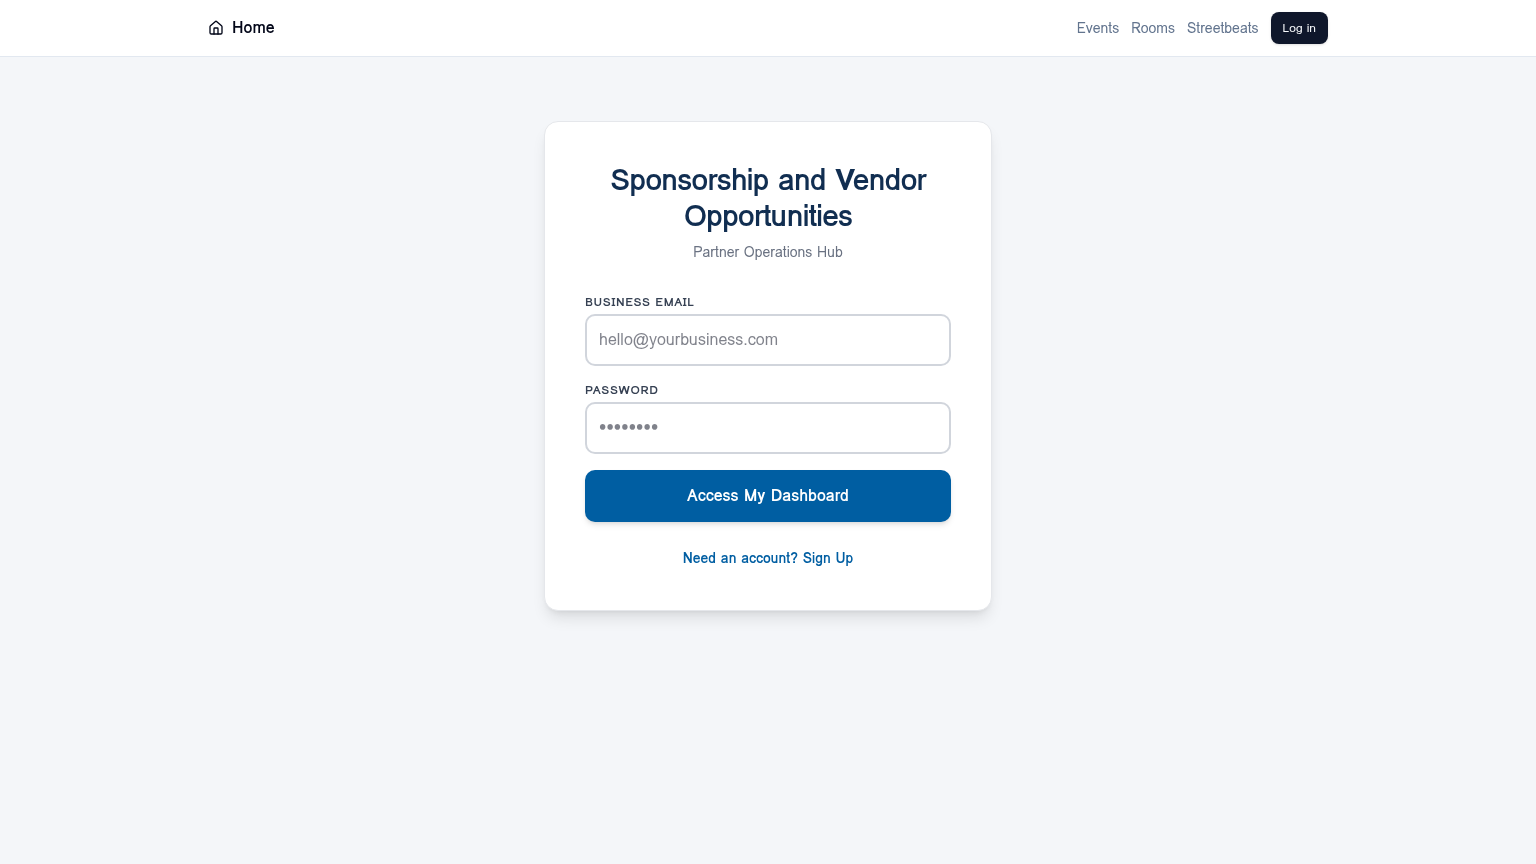
- 1
Sign in to the vendor portal
Go to/vendorand create an account if needed. - 2
Apply for events open to vendors
Pick an event, choose a booth tier, and submit your application with your business profile. - 3
Tell us about your sales & licensing
The application now asks four extra questions used by staff to triage your booth:- Will you be selling items? If yes, describe the products or services (menu, merchandise, services offered, price range).
- Are you licensed to do business and sell items? If yes, upload one or more proofs (sales-tax permit, health/cottage-food permit, business license, food handler cards, etc.) — multi-file upload is supported.
- Special requirements — electrical needs, water access, vehicle drop-off, allergens, accessibility, anything staff should know before assigning your spot.
- 4
Wait for staff approval
City staff review your application and supporting documents before any payment is collected. - 5
Review the contract and pay
Once approved, an in-app payment panel opens showing your tier, the exact amount due, and the full Vendor Agreement (event rules, cancellation/refund policy, indemnification, and insurance requirements). You must tick "I have read and agree to the contract terms" before the Submit Payment button enables. Card details are captured on the same screen and charged on submit; you'll receive a confirmation with a transaction reference and invoice number. - 6
Manage booth placement
After payment clears, your booth assignment and event-day logistics appear in the same vendor dashboard.
vendor-permits bucket and are only visible to you and the reviewing staff.Becoming a Sponsor
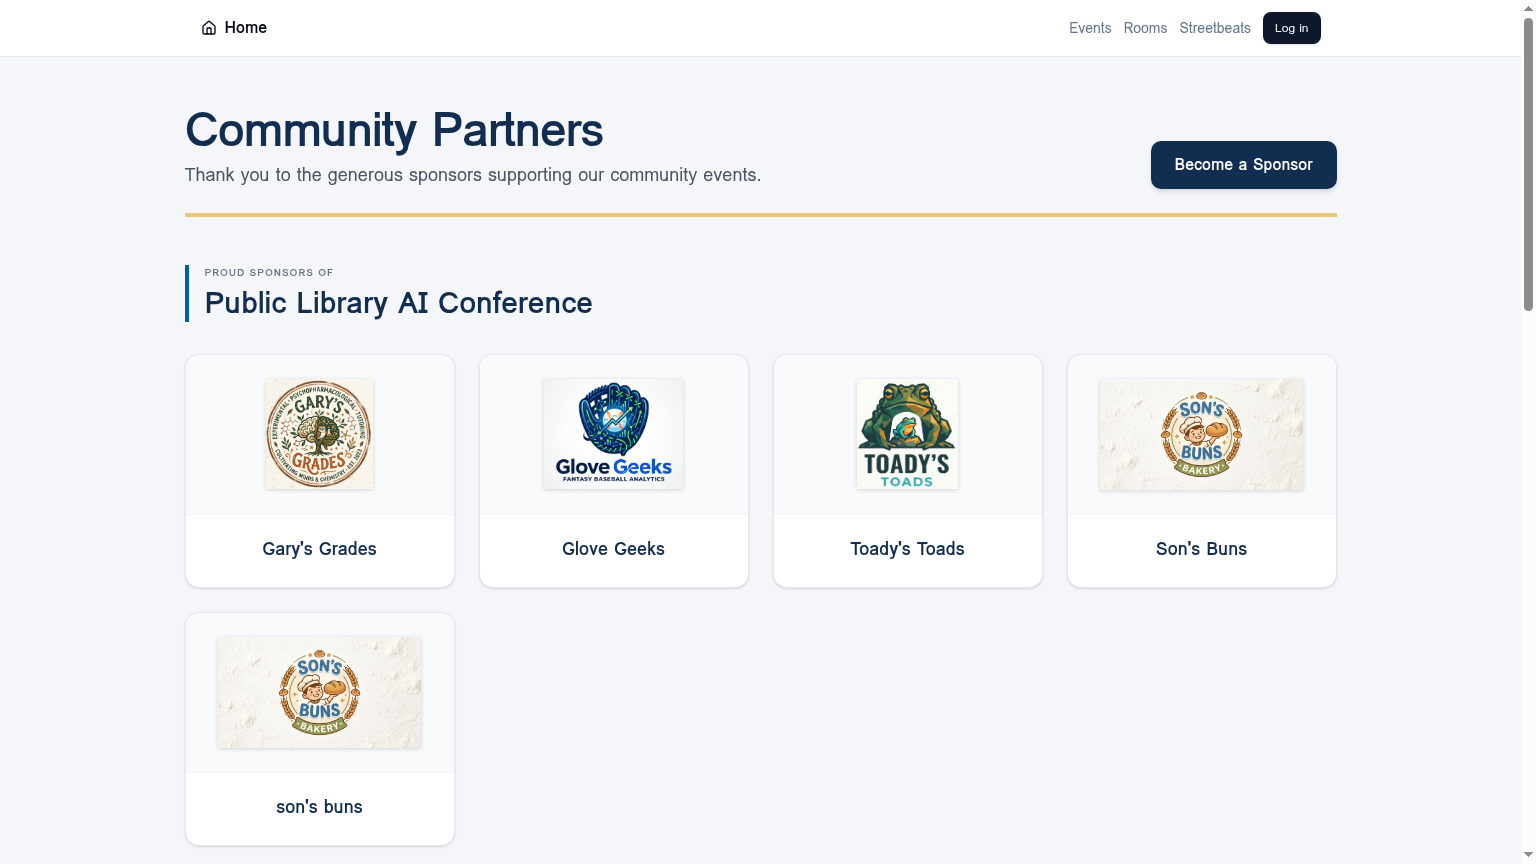
Browse current partners at /sponsors and click Become a Sponsor to start a conversation about tiers and placement. Sponsorship applications are submitted through the same /vendor portal — pick the event, choose a sponsorship tier (which controls logo placement, mentions, and benefits), and submit for staff review.
After approval, the portal opens the same payment + contract panel used for vendors. You'll see your tier and price, the full Sponsorship Agreement, and must check "I have read and agree to the contract terms" to authorize the charge. Payment is processed in-app and a confirmation with transaction reference and invoice number is issued immediately — your logo then appears on the event page and flyers.
Special Event Permits
Anyone planning a public event that needs city approval (parades, festivals, runs, block parties, etc.) applies online at /events/permits/apply. The form is a guided 5-step wizard with dynamic pricing and in-app payment.
- 1
Applicant & Event Basics
Primary contact, organization, event name, estimated participants, and event type. The event type is pulled from the city's current fee schedule and contributes to your total. - 2
Dates, Times & Logistics
Setup, main, and teardown windows; whether you'll serve alcohol (with TABC license number), have food vendors, need electrical service, or are including a parade route. - 3
Operations & Safety
Narrative answers for traffic control, litter control, and how you'll notify nearby residents and businesses. - 4
Document Uploads
Required: certificate of insurance, site plan, and traffic management plan. Files are stored privately in thepermit-docsbucket and are only visible to you and staff reviewers. - 5
Fees, Signature & Payment
The wizard adds the active base fee + your chosen route/trail option fee in real time. After typing your name to certify, the same USAePay checkout used for vendor booths opens. On a successful charge the permit is marked paid and sent to the staff review queue.
/my-permits or the My Permits card on your Hub.My Permits
The /my-permits page lists every Special Event Permit you've started or submitted, along with its current status:
- Draft — saved but not yet submitted. Click Resume to reopen the wizard or the trash icon to delete.
- Pending review — sent to staff; you can still view your answers and the calculated fee.
- Approved — staff have approved; the wizard will let you complete payment.
- Paid — payment captured; the city has your certificate on file.
- Rejected — see staff notes for why; start a new application if needed.
Exploring Venues
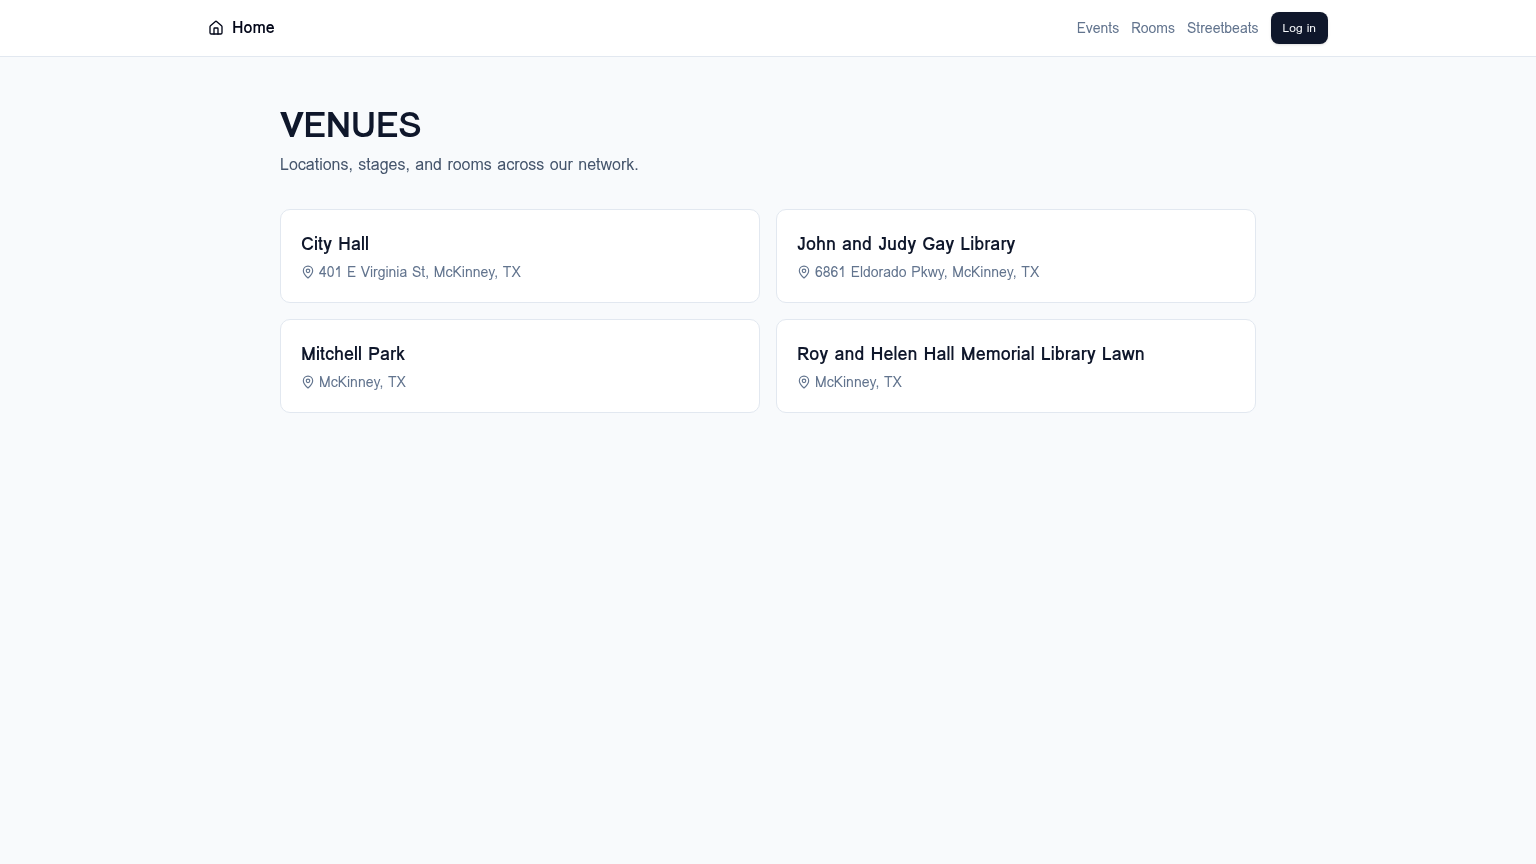
The /venues page lists every location, stage, and room in the network with addresses and capacities.
Staff Portal Overview
The staff portal at /staff has a dark sidebar (Event Ops) listing every operational area you can access. Items only appear if you have permission for them.
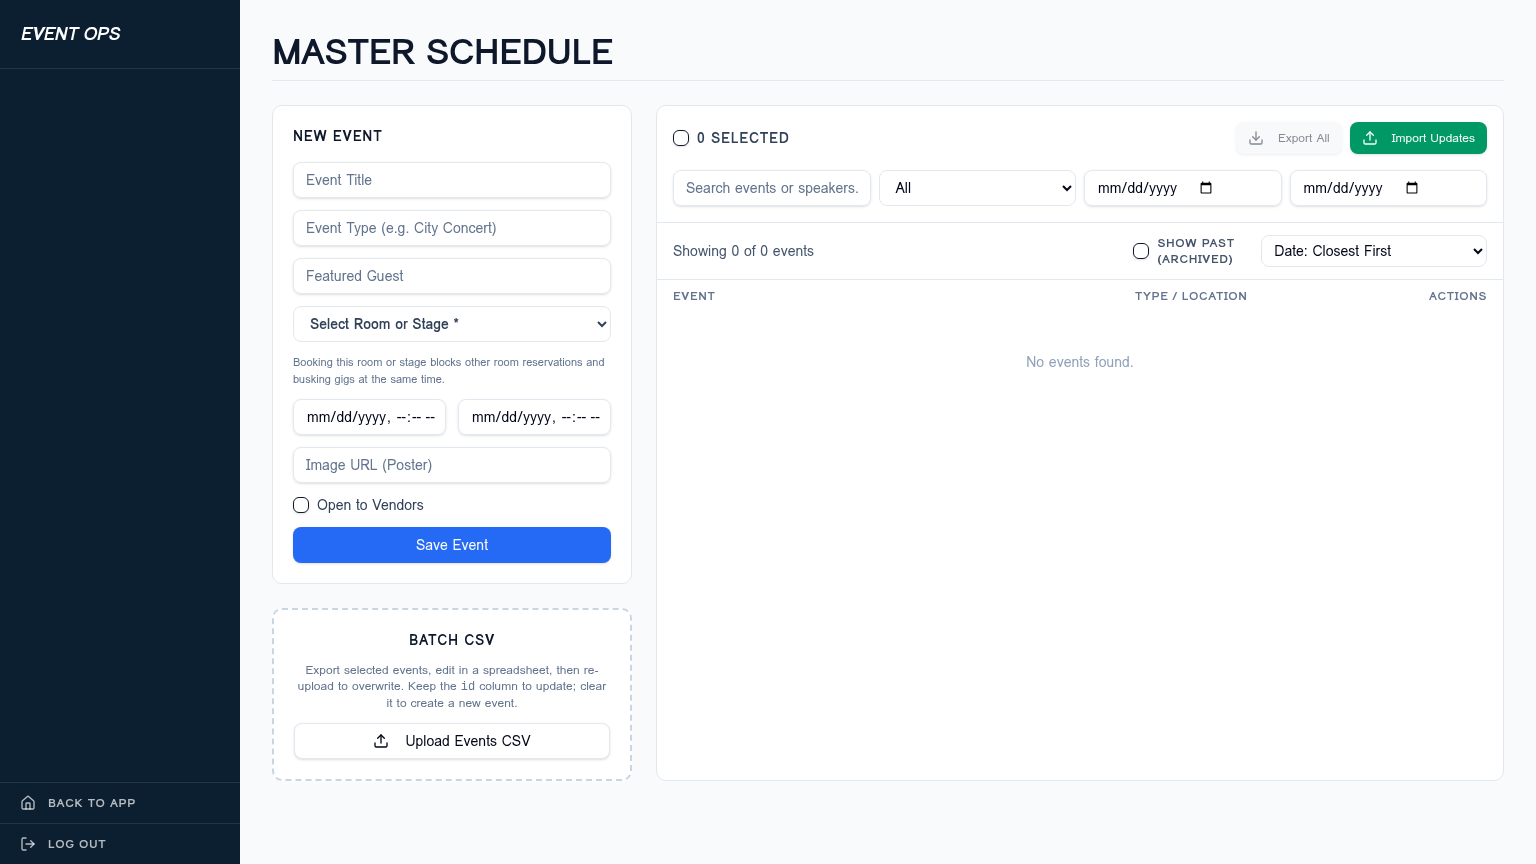
- Events — Master Schedule: create, edit, and CSV-import events.
- Venues & Stages — manage locations, stages, and rooms.
- Box Office — attendees, check-ins, and ticket sales.
- Vendors / Sponsors — review applications and assign booths.
- Community Music / Orgs / Events — approve and schedule.
- Room Reservations — approve, decline, or reschedule requests.
- Classes — manage the class catalog and registrations.
- Social Command — multi-channel social publishing and connections.
- Platform Settings — your profile and operational settings.
Managing an Event
Click any event from the Master Schedule to open its dashboard. Each event has tabs for Overview, Box Office, Marketing, Ticketing, Vendors, Volunteers, Reports, Attendees, Waitlist, Scanner, and Settings.
- 1
Create the event
Use the New Event form on the Master Schedule. Required fields: title, type, room/stage, start time. - 2
Add tickets and tiers
On the Ticketing tab, define tiers, capacity, and pricing. - 3
Manage attendees and waitlist
Live counts update as people buy. Move waitlisters into open seats with one click. - 4
Run the door
Open the Scanner tab on a tablet at the entrance to scan ticket QRs.
Box Office & Attendees
The Box Office page (/staff/attendees) is the cross-event view of every ticket holder. Filter by event, status, or search by name and email.
- Issue comp tickets, refund, or reassign seats.
- Resend QR codes by email.
- Check arrival status against scans.
Approvals (Music, Orgs, Vendors, Rooms)
Each application type lives in its own sidebar page. They share the same review pattern: see the queue, open a submission, then approve, reject, or request changes.
- 1
Open the queue
Pick Community Music, Community Orgs, Vendors, Sponsors, or Room Reservations from the sidebar. - 2
Review the submission
Applicant info, attachments, and history appear in the right pane. - 3
Decide
Approve to publish / activate, decline with an optional note (sent by email), or leave a comment and come back later.
Managing Staff Accounts
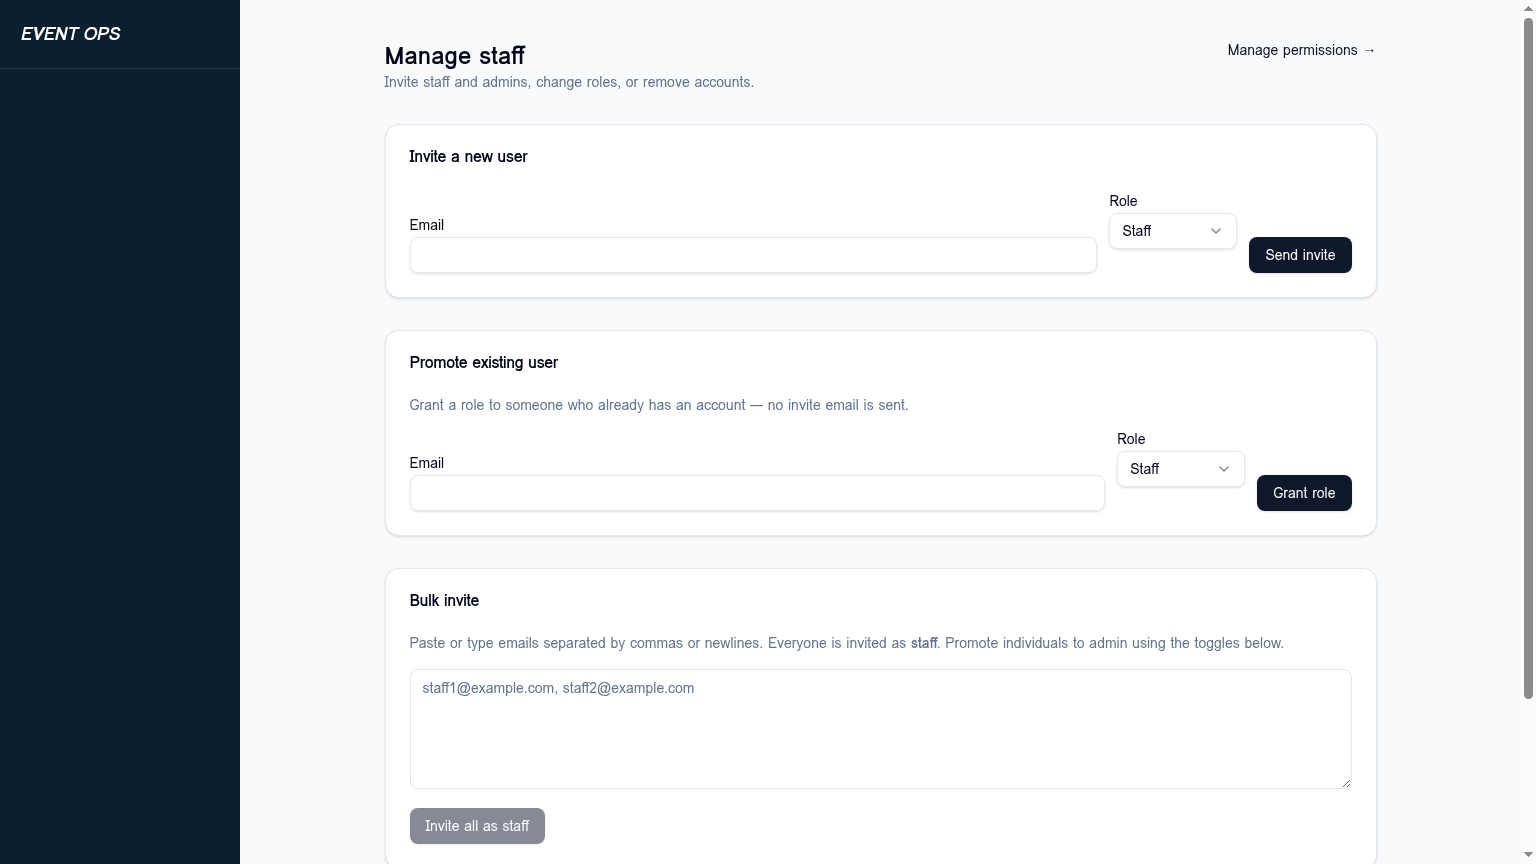
Admins manage staff from /staff/admin. You can:
- Invite a new user — sends an email with sign-up link and assigns the chosen role (staff or admin).
- Promote existing user — grant staff or admin to someone who already has a community account. No email is sent.
- Bulk invite — paste a list of emails to onboard multiple staff at once.
Granular Permissions
Open Manage permissions from the admin page header. Each staff member has a row; click to open a drawer with two tabs:
- Global — checkbox grid of every permission (sidebar pages and event-dashboard tabs). What's checked applies to all events.
- Per-event — pick an event and override permissions with grant, revoke, or inherit.
Platform Modules & Settings
Turn entire features on or off across the platform from the settings/modules area. Every major feature has its own toggle so you can phase rollouts or pilot a single program. Current modules:
- Events — the public events directory & ticketing.
- Venues & Stages — venue/stage directory and editor.
- Box Office — attendee management and check-in.
- Vendors / Sponsors — applications, contracts, payments.
- StreetBeats — musician roster and gig claiming.
- Community Orgs & Events — HOA / nonprofit submissions.
- Room Reservations — booking flow and instant-book toggle.
- Classes — class catalog and registration.
- Social Command — multi-channel social publishing.
- Special Event Permits — the 5-step permit wizard, My Permits, and the staff review queue.
Permit Settings & Fee Schedule
The Permit settings link on /staff/admin opens the Special Event Permit configuration page at /staff/admin/permits. Admins control two things here:
- Fee schedule — manage three categories of configurations:
- Event types — the radio choices applicants pick in step 1 (e.g., "5K Run", "Block Party", "Parade").
- Route / Trail fees — the route or trail options shown in step 5 (e.g., "River Walk Trail — $150").
- Base fees — flat fees added to every permit (sum of all active base fees, e.g., a $50 application fee).
- Permit review queue — every non-draft application appears here with applicant, event details, calculated fee, status, and uploaded documents. Staff can mark a permit Pending review → Approved / Rejected, and attach internal notes. Approving a permit unlocks the applicant's payment panel; payment moves the status to Paid.
Branding Engine
The Branding engine at /staff/admin/branding is the single source of truth for how the platform looks. It controls the full design-token set — not just two colors — and powers a live preview, accessibility checks, a logo/favicon pipeline, and a Draft → Publish workflow with version history.
- Full token system — primary, secondary, accent, surface, foreground, border, radius, typography pair, and more. Edits apply instantly in the live preview pane.
- Accessibility checks — every color pair is scored against WCAG contrast. Failing combinations are flagged before you can publish.
- Logo variants & favicons — upload a master logo; the favicon pipeline auto-generates the 32 px, 180 px (Apple touch), and 512 px (PWA) versions in a single click.
- Curated font picker — choose from a curated set of heading/body pairs with previews; the chosen pair flows into CSS variables consumed by every page.
- Presets, versions & drafts — save reusable presets, work in a draft without affecting the live site, then publish. Every publish snapshots the previous state so you can roll back from Version history.
Tenants (Multi-Site)
Tenants let the platform serve multiple branded sites from one installation. Manage them at /staff/admin/tenants.
- Create a tenant with a slug, display name, and optional custom host (e.g.
events.cityname.gov). - Tenant-level branding — each tenant has its own token overrides, logos, and favicon, layered on top of the global design system.
- Resolution — when a request comes in, the platform matches by host first, then by
/t/<slug>path, and falls back to the global default.
No-Code Home Page Editor
The landing page at / is fully editable — no code required. Open /staff/admin/home for a side-by-side editor with a live preview on the right.
- Hero — badge, title, subtitle, sign-in copy, and a list of secondary CTA buttons (each can be gated to a specific module).
- Sections — drag-and-drop ordered blocks: portal cards, explainer cards, rich text, image banner (with built-in uploader), and CTA band. Cards pick from a curated icon set and a fixed color-theme palette.
- Footer — tagline, body copy, and copyright line.
- Editing scope — toggle between the global default and any tenant. Tenant rows seed from the global one on first edit, so you only customize what's different.
- Draft & Publish — save drafts while you iterate; publishing snapshots the previous live version into history so you can revert with one click.
requires_module — if that module is disabled, the card is hidden automatically. Use this to safely advertise features still rolling out.Departments & Active Context
The platform is organized into departments (City Hall, Fire, Parks & Rec, Library, etc.). Every event, venue, room, vendor application, and reservation belongs to exactly one department. This keeps each team's queue, calendar, and box office focused on their own work — while still letting the public see and book across the whole city from one site.
A single staff login can belong to multiple departments (for example, the city clerk who supports both City Hall and the Library). When that's the case, a department picker appears in the top-right of the site header. Whatever you pick is your Active Department — every staff page, sidebar count, and "new event / new booking" form fills in that department until you switch.
Department Hub Pages
Every department has a public landing page at /departments/<id> showing its logo, name, and — all scoped to that one department — upcoming events, classes, bookable rooms, and any Streetbeats gigs at its stages. No login required.
/departments — the public directory lists every department with a quick count of events, classes, and rooms. For example: open /departments, click Library, and you'll see only what the Library offers.- Great for sharing — link the Fire Department's page to send people straight to their open houses and training rooms.
- Theming (colors, logo) matches the department's brand, so the page doesn't feel like a generic listing.
- Visitors can reorder or hide the Events / Classes / Rooms / Gigs sections with the Customize toolbar; the layout is saved per account.
- Clicking through goes straight into ticketing, class registration, or room booking with the department's policy applied automatically.
Department Branding & Theming
When you're viewing a department's hub — or when staff have a department selected as active — the site automatically adopts that department's brand colors. Behind the scenes, each department stores a small block of CSS variables (primary color, accent, etc.) that override the default theme globally for the current view.
Working in Your Active Department
Almost every page in the Staff Portal is filtered by your active department:
- Master Schedule only lists events whose department_id matches.
- Venues & Stages shows only the rooms/venues owned by that department.
- Box Office & Attendees only show tickets for that department's events.
- Approvals (vendors, sponsors, room reservations) only show requests for things this department owns.
- New Event auto-fills the department, and the Staff Owner dropdown only lists users who belong to that same department.
Cross-Department Room Requests
Staff frequently need to book a room that belongs to another department (e.g., the Fire Dept. wants a City Hall conference room). The /staff/room-reservations page now has two tabs to keep this clear:
- 1
Submit a request
Use the New reservation dialog. If the room is owned by a different department, a banner warns you it's a cross-department request; your active department is stamped as the requester. - 2
Track it under Outbound
Your request appears in your Outbound tab with a "to {owning department}" badge. You'll see status updates (pending → approved / declined) as the other team reviews it. - 3
Review incoming requests under Inbound
When another department asks for one of your rooms, it shows up in your Inbound tab with a "from {requester department}" badge. Approve or decline — only the inbound side shows action buttons.
Managing Departments
Super admins manage departments from /staff/admin/departments. The page has a datatable of every department and full CRUD via a dialog editor.
- Department Name — shown on the public hub, in the staff sidebar badge, and on cross-department badges.
- Logo upload — stored in the
department-logosbucket and rendered on the department hub and header. - Room Policy Text — the agreement the public must accept before booking any room owned by this department.
- Brand CSS — a small JSON block of CSS variables (e.g.
{ "--primary": "262 83% 58%" }) applied globally when this department is active or being viewed.
Assigning Users to Departments
Open Manage permissions from the admin page and pick a user. The drawer now has a Departments tab where you can attach the user to one or more departments and grant them either:
- staff — works inside that department's queues (events, approvals, box office) with whatever global/per-event permissions you've granted.
- dept_admin — same as staff plus can edit that department's branding, room policy, and assignments.
Program Guidebook Generator
Admins can compile every approved event, StreetBeats performance, and class within a date range into a print-ready PDF program guide, with sponsor ads automatically interleaved. Open it from Admin → Generate Guidebook.
Quick generate
- 1
Pick a date range
Set a start and end date. Click Preview counts to see how many events, gigs, classes, and sponsor ads will land in the PDF. - 2
Generate PDF
Click Generate PDF for an automatic layout. The browser downloadsprogram-guide-{start}_to_{end}.pdf.
Customize with the Layout Builder
Need finer control? Click Open in Layout Builder to enter the Guidebook Canvas, where every event, gig, class, and ad is a drag-and-drop card.
- Drag any row to reorder it within the print edition.
- Hide / show items that don't fit the visual flow.
- Edit print copy to override a title or description just for this edition — the underlying database record is not touched.
- Reframe the card image — click and drag on any card's image to set its focal point. The PDF crops around that point so faces and signage stay in frame.
- Insert ad slot drops a sponsor's bought ad block exactly between any two listings.
- Click Export PDF to render the final layout.
Guidebook sponsors (no event required)
You don't have to attach a sponsor to an event to get them into the guidebook. On the Generate Guidebook page, scroll to Guidebook sponsors and fill in the form:
- 1
Enter company info
Company name is required. Add contact name, email, logo URL, and ad copy as available. - 2
Click Add guidebook sponsor
The sponsor is created as standalone (no event link) on the Guidebook Ad Space tier and immediately marked approved. The tier is auto-created the first time it's needed. - 3
They appear in the next PDF
Standalone and event-attached guidebook sponsors are pooled together and rotated through the cover logo, full-page ad, half-page slots, and footer credits.
Communications (Email Campaigns)
The Communications module is a native replacement for tools like Mailchimp. Compose rich-text emails, target specific community segments, send immediately or schedule for later — all without leaving the platform. Open it from Event Ops sidebar → Communications.
Permission
Access is gated by the Communications staff permission (page.communications). Grant it under Admin → Permissions.
One-time setup
The module sends through Resend using a server-stored API key. The following secrets can be set in Project Settings → Secrets:
RESEND_API_KEY— required. Your Resend API key.RESEND_FROM— optional. Verified sender likeCity Events <hello@yourdomain.com>. Defaults toonboarding@resend.devfor testing.SITE_URL— optional. Used in unsubscribe links. Defaults to the deployed app URL.DISPATCH_SECRET— optional. Protects the/api/public/dispatch-duecron endpoint.
Compose a campaign
- 1
Click New campaign
A draft is created instantly and the editor opens. - 2
Write the email
Use the TipTap rich-text editor: headings, bold, italic, lists, blockquote, and links. Content is sanitized server-side before sending. - 3
Choose your audience
Add one or more audience segments:- All active users — every signed-up community member.
- Event attendees — everyone with a ticket to a specific event.
- Approved vendors — applicants whose status is approved or paid.
- Department members — staff and admins in a given department.
- 4
Send now or schedule
Pick Send now to dispatch immediately, or Schedule for… with a date and time. Scheduled campaigns are picked up by a per-minute cron job that pings/api/public/dispatch-due. - 5
Send a test first
Enter your email in the Send test box to preview the real rendered email in your inbox before sending to everyone.
After sending
Each campaign records its recipients, status (sent/failed), and the Resend message ID for follow-up. Sent campaigns are read-only. Recipients who click the unsubscribe link at the bottom of any email are permanently added to the campaign_unsubscribestable and excluded from all future campaigns.
RESEND_API_KEY never leaves the server. The dispatch route runs server-side via TanStack server functions; the browser only sees campaign metadata and recipient counts.Surveys & Feedback
The Surveys module is a native replacement for tools like SurveyMonkey. Build multi-question surveys, share a public link, and view aggregated results with charts — all responses are anonymous by design. Open it from Event Ops sidebar → Surveys.
Permission
Access is gated by the Surveys & Feedback staff permission (page.surveys). Grant it under Admin → Permissions.
Build a survey
- 1
Click New survey
A draft is created instantly and the editor opens. - 2
Title and description
Use the rich-text editor for the description — explain what the survey is for and how the answers will be used. - 3
Add questions
Three question types are supported:- Short text — free-form response.
- Rating 1–5 — five-star picker, great for NPS-style scores.
- Multiple choice — one answer from your option list.
- 4
Set active and share the link
Toggle the survey Active, then copy the public link (/survey/<id>). Anyone with the link can respond — no sign-in required. - 5
Optional: post-submit redirect
Set a Redirect URL to send respondents to a thank-you page, the department hub, or any internal route after they submit. Leave blank to send them back to the home page.
View results
Click the Analytics icon on any survey row (or the Analytics button in the editor) to see:
- Total response count.
- Bar charts for rating and multiple-choice questions, with per-option tallies.
- Full text dumps for free-form questions.
- Average score for 1–5 rating questions.
Civic Quests — Overview
Civic Quests is an optional discovery layer that turns visiting local landmarks, attending events, and supporting partner businesses into a guided, point-earning experience. Residents and visitors follow a quest's waypoints, check in at each stop, and earn badges and leaderboard points.
- Explore at
/explore— browse every published quest with its theme, length, and reward. - Quest detail at
/explore/<id>— see the full waypoint list with hero images, a live progress bar, social proof ("127 explorers completed this · 38 in progress"), and start the quest. - My Wallet at
/wallet— every prize ticket and raffle entry you've earned, with scannable QR codes for pickup. - Leaderboard at
/leaderboard— public top-100 ranking with a podium for the top 3 and a "your rank" pill for signed-in players. - Hub badges strip — signed-in residents see their earned quest badges on the Hub with a shortcut to the leaderboard.
civic_quests platform module. When an admin turns it off, every quest surface (Explore, Quest detail, Leaderboard, Staff report, Admin manager, and the Hub badges strip) is hidden or replaced with a "module disabled" stub.Playing a Quest
- 1
Pick a quest from Explore
Open/exploreand choose a quest. Each card shows the estimated duration, number of waypoints, and reward badge. - 2
Start the quest
On the quest detail page, click Start quest. You must be signed in — guests are bounced to the login page and returned here afterward. - 3
Check in at each waypoint
Travel to the waypoint and tap the action that matches its type:- QR scan — opens the camera scanner and checks you in when the printed waypoint QR is read.
- Geo-location — uses your device location and confirms you're within the configured radius.
- Honor system — a single tap to confirm you're there.
- 4
Earn the badge, prize ticket, and raffle entries
Completing the final waypoint awards the quest badge, adds the quest's points to your leaderboard score, and (if staff attached one) mints a virtual prize ticket in your wallet plus any raffle entries for open raffles linked to the quest. A confetti burst and an in-app banner link you straight to/wallet.
My Wallet — Prize Tickets
Every prize you earn from a completed quest lands in /wallet as a virtual ticket with a unique serial and scannable QR code. Show it at the pickup location to redeem.
- Status badges — Issued (ready to redeem), Redeemed (already picked up), or Void.
- Prize details — name, sponsor (for partner prizes), and pickup location are shown on the ticket card.
- QR code — tap a ticket to enlarge the QR for scanning at City Hall or the sponsoring business.
- Mixed catalog — prizes can be fulfilled by the city directly or by a sponsoring business. Either way the ticket flow is identical.
Raffle Entries
Some quests grant entries into a city-wide rafflerather than (or in addition to) a guaranteed prize. Every time you complete a quest linked to an open raffle, your entry count for that raffle goes up.
- Open the Raffle entries panel on
/walletto see each active raffle, how many entries you hold, the prize, and the scheduled draw date. - When staff draw the raffle, winners are notified and the ticket appears in their wallet just like a quest prize.
- You can keep earning entries until the raffle's status changes from Open to Drawn.
Public Leaderboard
The leaderboard at /leaderboard is public — no sign-in required to view. It shows the top 100 explorers ranked by total quest points, with a podium for the top 3.
- Signed-in users see a Your rank pill even if they are outside the top 100.
- Display names and avatars come from the user's profile. Residents who prefer not to appear can clear their display name in Profile settings.
- Scores update in near real-time as quests complete.
Staff Quest Reporting
Staff can review quest performance outside the admin panel at /staff/quests-report. The report is linked from the Civic Quests card on the Staff Admin landing page.
Permission
Access is gated by the Quest Reporting staff permission (page.quests_report). Grant it under Admin → Permissions.
What you see
- Per-quest table — starts, completions, completion rate, average time-to-finish, and unique players.
- Waypoint funnel drawer — click any quest to see the drop-off at each waypoint and spot stops that are confusing or unreachable.
- CSV export — download the raw activity log for external analysis or grant reporting.
civic_questsis disabled, the page renders a stub and the navigation card is hidden.Admin — Module Toggle & Management
Turn the module on or off
Civic Quests is a first-class platform module. Open Admin → Modules and toggle Civic Quests. When disabled:
- The
/explore,/explore/<id>,/leaderboard, and/staff/quests-reportroutes render a "module disabled" stub. - The Quest Badges strip on the Hub is hidden.
- Quest management is removed from the Staff Admin landing.
- All quest server functions short-circuit with a typed
{ disabled: true }response so direct API calls also fail safely.
Manage quests
With the module enabled, manage quests from Admin → Civic Quests (/staff/admin/quests):
- Create a quest with a theme, reward badge, point value, and cover image.
- Add waypoints in order — each with a title, check-in method (QR scan, geo-location, or honor system), optional hint, and a hero image you can either upload or generate with the built-in AI illustrator.
- Attach prizes directly in the quest editor — tick any prize from the catalog and finishers automatically receive a virtual ticket on completion.
- Publish to make the quest visible on
/explore, or keep it as a draft while you finalize content.
Permissions summary
module.civic_quests— admin-only, controls the whole module.page.quests_report— staff permission for the reporting page.- Quest management, prize catalog, and raffle administration inherit the existing admin role.
- Ticket redemption at
/staff/redeemis open to anyone with the staff or admin role.
Admin — Prize Catalog
The prize catalog at /staff/admin/prizes is a single inventory of every reward a citizen can win — both city-owned rewards and items contributed by sponsoring businesses (a "mixed catalog").
Create a prize
- 1
Open the prize editor
Click + New prize on the catalog page. - 2
Fill in the basics
Name, description, image (upload or AI-generate), and pickup location. - 3
Choose who fulfils it
City for rewards handed out at City Hall, or Sponsor for a partner business — in which case also fill in the sponsor name so the citizen sees who supplied the prize. - 4
Set inventory
Optional total and remaining quantity. Leave blank for unlimited stock. - 5
Attach to a quest or raffle
From Admin → Civic Quests tick the prize in the quest editor, or from Admin → Raffles select it as the raffle prize.
Admin — Raffles
Raffles at /staff/admin/raffles let you award a prize by random draw instead of (or in addition to) the guaranteed prize tickets a quest hands out.
- 1
Create the raffle
Set a title, description, image, prize, number of winners, and scheduled draw date. - 2
Link the quests that grant entries
Pick one or more published quests. Every time a citizen completes a linked quest, they get one entry (or more if the quest is configured to grant multiple). - 3
Watch entries roll in
The admin page shows each open raffle with a running count of entries and unique participants. - 4
Draw winners
Click Draw winners when the raffle closes. The system picks the configured number of winners at random, marks the raffle Drawn, and mints a prize ticket for each winner — which shows up in their/wallet.
Staff — Redeeming Prize Tickets
When a citizen presents a prize ticket, staff verify and redeem it at /staff/redeem. Any user with the staff or admin role can use the page.
- 1
Scan the QR or paste the serial
The page opens a camera scanner by default. If the camera isn't available, paste the serial number printed under the QR into the manual-entry field. - 2
Verify the ticket
The lookup shows the prize, the citizen's name, the issuing quest or raffle, and the current status (Issued, Redeemed, or Void). Already-redeemed tickets are clearly flagged so they can't be reused. - 3
Mark as redeemed
Confirm the pickup and click Mark redeemed. The ticket flips to Redeemed in the citizen's wallet immediately, with your user ID and timestamp recorded for audit.
311 Reporting — Overview
The 311 Non-Emergency Reporting module lets residents flag issues like potholes, graffiti, broken streetlights, and park maintenance directly from their phone — with a photo, location, and live status tracking from submission to resolution.
- Intake at
/report— pick a category, add a photo (required), drop a pin or use your location, and submit. Sign-in is required. - My Reports at
/my-reports— track every ticket you've submitted with a pizza-tracker style status bar and public staff updates in real time. - Staff Dispatch at
/staff/dispatch— a Kanban board grouping tickets by status, scoped to the staff member's department.
Submitting a Report
- 1
Open /report and sign in
A photo and a verified account are required so staff can follow up if they need more information. - 2
Pick a category
Choose from Pothole, Graffiti, Park Maintenance, Streetlight, Trash & Recycling, Sidewalk, or Other. The category determines which department receives the ticket. - 3
Add a photo and a description
Snap a photo from your phone or upload one from your library. Describe what's wrong in 10–2000 characters. - 4
Drop your location
Tap Use my location for one-touch geolocation, or type an address and drag the pin on the map preview to fine- tune. - 5
Submit and track
After submitting you're redirected to/my-reportswhere the tracker updates in real time as staff change status.
Tracking Your Reports
/my-reports shows every ticket you've submitted with a four-step pizza tracker: Submitted → Received → In Progress → Resolved. The tracker updates instantly when staff change the status — no refresh needed.
- Public notes — when staff post a note marked "public", it appears on your tracker so you know what's happening.
- Internal notes stay private to the assigned department.
- Photo & location remain visible for your reference and for staff working the ticket.
Staff Dispatch Board
Staff with department access open /staff/dispatch to work the queue. Tickets are filtered to the department(s) the staff member belongs to (admins see all).
- 1
Scan the Kanban
Four columns — Submitted, Received, In Progress, Resolved — show ticket cards with category, photo thumbnail, location, and time submitted. - 2
Open a ticket
Click a card to open the detail drawer with the full photo, description, requester email, and an embedded map of the reported location. - 3
Update status and add a note
Change the status to advance the ticket. Add a public note to update the citizen's tracker, or an internal note for department-only context. Every update is logged for audit.